Nest.js vs Controller API
Nest.js builds on top of Express (or optionally Fastify) and introduces a structured, modular architecture with features like decorator-based routing, dependency injection (DI), and controllers, making it more comparable to .NET Controller APIs than plain Express.js. By enforcing a convention-driven approach similar to ASP.NET Core, Nest.js simplifies the development of scalable applications while integrating well with TypeScript’s strong typing. Its use of decorators for defining routes and DI for managing services closely resembles the approach used in .NET, making it feel more structured and maintainable than raw Express.
Since Nest.js runs on Node.js, it inherits the limitations of JavaScript’s single-threaded event loop, leading to potential bottlenecks in CPU-bound workloads. While Fastify can improve Nest’s performance over Express, it still comes up short against .NET’s high-performance Kestrel server, which is optimized for multi-threading and asynchronous processing. That said, Nest.js is more production-ready than Express, as it includes built-in support for authentication, validation, middleware, and structured DI, reducing the need for third-party dependencies and more "batteries included".
If you're already using Nest.js
If your team is already using Nest.js, chances are that there is a need for the more structured approach of Nest.js over Express.js. In this case, you will find that .NET controller web APIs are conceptually similar, but probably overall easier to work with because of the type system (e.g. parameter type checking is automatic, OpenAPI schema bindings are "free")
Setting Up
This setup follows the Nest.js documentation:
# Install the nestjs CLI
npm i -g @nestjs/cli

# Create a new default Nest.js app from /src/typescript
nest new nest-app

# Run and watch for file changes
npm run start:dev # ✅ Server ready!# macOs .NET Controller API setup
# Scaffold the API from /src/csharp/webapi-controllers
dotnet new webapi --use-controllers --no-https
# Run and watch for file changes
dotnet watch --non-interactive # ✅ Server ready!INFO
Nest.js does a great job of also including testing out-of-the-box whereas the dotnet CLI expects you to set up unit testing separately and does not include it out-of-the-box.
Source code
💡 The source code for this walkthrough is available in GitHub for .NET and for Nest.js.
Application
Entry Point
The default entry point created by the CLIs
import { NestFactory } from '@nestjs/core';
import { AppModule } from './app.module';

async function bootstrap() {
  const app = await NestFactory.create(AppModule);
  await app.listen(3001);
}
bootstrap();var builder = WebApplication.CreateBuilder(args);
// Add services to the container.
builder.Services.AddControllers();
// Learn more about configuring OpenAPI at https://aka.ms/aspnet/openapi
builder.Services.AddOpenApi();
var app = builder.Build();
// Configure the HTTP request pipeline.
if (app.Environment.IsDevelopment()) {
app.MapOpenApi();
}
app.UseAuthorization();
app.MapControllers();
app.Run();Using the minimal configuration:
import { NestFactory } from '@nestjs/core';
import { AppModule } from './app.module';

async function bootstrap() {
  const app = await NestFactory.create(AppModule);
  await app.listen(3001);
}
bootstrap();var builder = WebApplication.CreateBuilder(args);
builder.Services.AddControllers();
var app = builder.Build();
app.MapControllers();
app.Run();Controllers
INFO
Here, I've re-written the default .NET endpoint for a weather controller to match the Nest.js default example and renamed the default WeatherForecastController to AppController:
import { Controller, Get } from '@nestjs/common';
import { AppService } from './app.service';

@Controller()
export class AppController {
  constructor(private readonly appService: AppService) {}

  @Get()
  getHello(): string {
    return this.appService.getHello();
  }
}

// http://localhost:3001 -> "Hello, World!"using Microsoft.AspNetCore.Mvc;
namespace TryCsharp.Controllers;
[ApiController]
[Route("[controller]")]
public class AppController(
ILogger<AppController> logger
) : ControllerBase {
[HttpGet()]
public string GetHello() => "Hello, World!";
}
// http://localhost:5068/app/ -> "Hello, World!"Dependency Injection
Basics
Here, we see how the dependency injection works.
// Snipped...
export class AppController {
  constructor(
    private readonly appService: AppService
  ) {}
  // Snipped...
}// Snipped...
public class AppController(
ILogger<AppController> logger
) : ControllerBase {
// Snipped...
}In both cases, we see constructor injection where the dependent service is automatically injected into the constructor of our class. In the C# case, we are using the primary constructor to simplify this code.
Registering Services
In Nest.js, services are registered via modules into the DI container while in .NET, this is done via IServiceCollection.
There are multiple patterns of organizing service registration with the DI container in .NET (more advanced approaches can use reflection to dynamically register modules). Here, we'll look at the basic approach and simple and common pattern for organizing service registration using extension methods.
We'll create an AppService.cs just like the Nest.js example.
// 📄 app.module.ts
import { Module } from '@nestjs/common';
import { AppController } from './app.controller';
import { AppService } from './app.service';

@Module({
  imports: [],
  controllers: [AppController],
  providers: [AppService],
})
export class AppModule {}

// 📄 app.controller.ts
export class AppController {
  constructor(
    private readonly appService: AppService
  ) {}

  @Get()
  getHello(): string {
    return this.appService.getHello();
  }
}// 📄 AppService.cs to match Nest.js
public class AppService {
public string GetHello() => "Hello, World!";
}
// 📄 Program.cs: basic method of registering a service
builder.Services.AddScoped<AppService>();
// 📄 AppController.cs: add constructor injection
[ApiController]
[Route("[controller]")]
public class AppController(
ILogger<AppController> logger,
AppService appService // 👈 Inject our new service
) : ControllerBase {
[HttpGet()]
public string GetHello() => appService.GetHello();
}Using C# Extension Methods
Nest.js modules are used to organize registrations. In .NET, this is typically done using extension methods. Let's reproduce the above using extension methods
// /src/csharp/webapi-controllers/Setup/SetupAppServices.cs
public static class SetupAppServicesExtension {
  public static IServiceCollection SetupAppServices(
    this IServiceCollection services
  ) {
    services.AddScoped<AppService>();
    return services;
  }
}

// /src/csharp/webapi-controllers/Program.cs

// builder.Services.AddScoped<AppService>();
builder.Services.SetupAppServices(); // 👆 Equivalent
builder.Services.SetupDatabaseServices(); // e.g.
builder.Services.SetupHttpClientServices(); // e.g.
Now we can set up multiple services in our extension method SetupAppServices()
Middleware
Both Nest.js and .NET support middleware that serve a variety of purposes. This guide won't cover them in detail, but will show how they map conceptually.
| Purpose | Nest.js | .NET Web API |
|---|---|---|
| Overview | Nest.js has middleware, exception filters, pipes, guards, and interceptors. | .NET has middleware and filters (filters are really just specialized middleware) |
| Exception filters | Nest.js exception filters | .NET exception filters |
| Pipes | Nest.js pipes | .NET action filters |
| Guards | Nest.js guards | .NET authorization filters |
| Interceptors | Nest.js interceptors | .NET endpoint filters |
Other Framework Features
Unlike Express.js, Nest.js is a fully featured framework that feels pretty similar to .NET controller web APIs. The table below should help map some of the main features from one to the other, regardless of which way you're going.
| Feature | Nest.js | .NET Web API |
|---|---|---|
| Parameter mapping | Nest.js query parameters | .NET explicit parameter binding |
| Payload binding | Nest.js payload binding (@Body maps to .NET's FromBody attribute which is implicit on POST) | .NET payload binding (see the first example; this is the default behavior with POST) |
| Route constraints | Nest.js validators. By default, Nest.js will allow a route with a parameter like increment(@Param("count") count: number) to accept a string without complaint. Manual validation is required to ensure the types match. In this codebase, try http://localhost:3001/increment/asdf and it will still work without a validator. | .NET route constraints are built in, but even by default, passing a string to a route that expects an int parameter will fail with an error In our .NET controller API, you can test this route: http://localhost:5068/app/increment/asdf and see that this will generate a type mismatch error. |
| OpenAPI | Nest.js setup for OpenAPI. Note that it requires using JavaScript class as well as annotations. It is possible to then extract types from this using specialized mapped types. | .NET OpenAPI features (note that these are enabled by default (see our code example above where we removed it); in general, .NET web API features can be turned on progressively) |
Here, C#'s static type system really shines because the type bindings can be largely resolved automatically with no special decoration required for the most part; there's no need to decorate classes for OpenAPI bindings except where special behavior is desired.
Performance
How do they stack up?
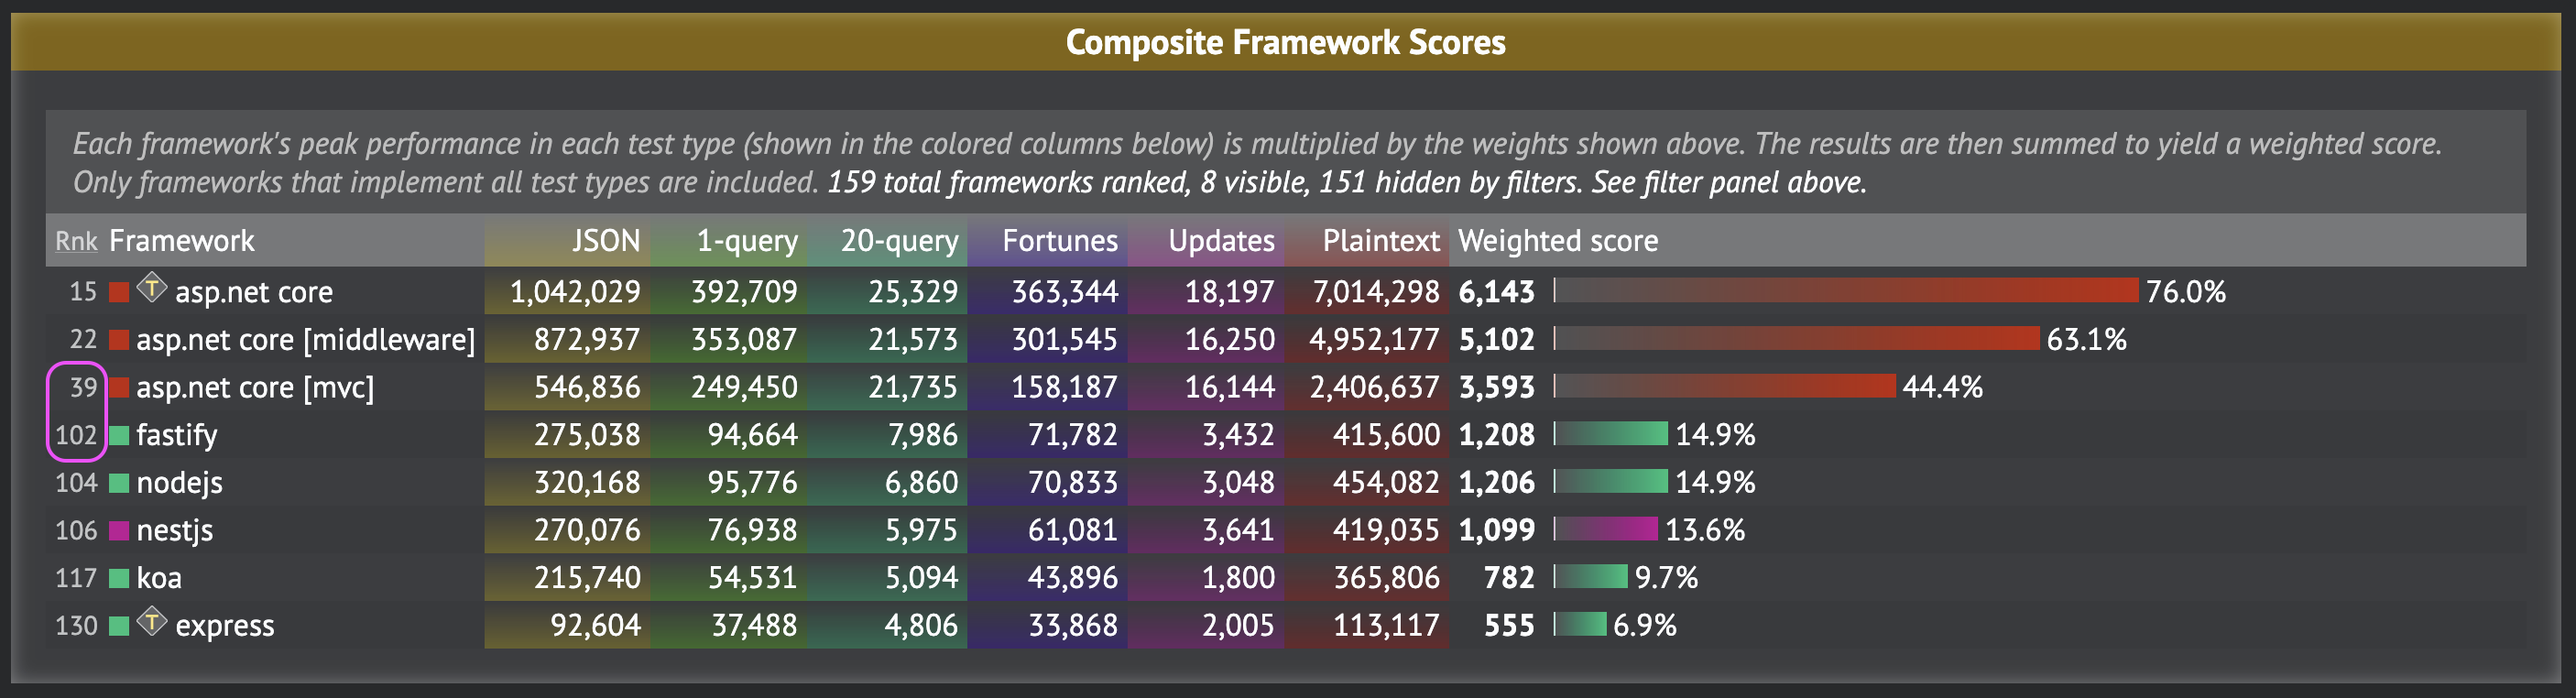
// Nest.js @ #106
// 419,035; See reference link below
@Get('plaintext')
@Header('Server', 'NestJS')
@Header('Content-Type', 'text/plain')
getHello(): string {
  return 'Hello, World!';
  }

// 270,076
@Get('/json')
@Header('Server', 'NestJS')
@Header('Content-Type', 'application/json')
getJson() {
  return { message: 'Hello, World!' };
}// ASP.NET Core @ #15
// 7,014,298; See reference link below
app.MapGet("/plaintext", () => "Hello, World!");
// 1,042,029
app.MapGet("/json", () => new { message = "Hello, World!" });.NET's multi-threaded runtime here has a big advantage over Node.js. The main takeaway is that for a given dollar spend on infrastructure, you'll achieve higher throughput with .NET than with Node.js based application servers. Even in cases where it's not I/O bound, like the JSON and plaintext examples, .NET's multi-threaded runtime smashes Node.js.
Implementation:
Packaging for Deployment
# Use alpine for size, but feel free to use other builds if running into issues.
FROM node:20-alpine
WORKDIR /usr/src/app

# Copy over assets
COPY package.json ./
COPY package-lock.json ./

# Install dependencies.
RUN npm ci

# Copy source
COPY . .

# Build the TypeScript
RUN npm run build

# Start the server.
EXPOSE 3001
CMD ["node", "dist/index.js"]

# From src/typescript/nest-app
# ✅ docker buildx build -t ts/nest-web-api -f ./Dockerfile .# Build layer
FROM mcr.microsoft.com/dotnet/sdk:9.0 AS build
WORKDIR /app
# Our project layer so we only update on new deps
COPY ./webapi-controllers.csproj ./webapi-controllers.csproj
# Restore dependencies
RUN dotnet restore
# Copy over code and publish
COPY ./Program.cs ./Program.cs
# Build the binaries
RUN dotnet publish ./webapi-controllers.csproj -o /app/published-app --configuration Release
# Runtime layer
FROM mcr.microsoft.com/dotnet/aspnet:9.0 AS runtime
WORKDIR /app
COPY --from=build /app/published-app /app
ENTRYPOINT [ "dotnet", "/app/webapi-controllers.dll" ]
# From src/csharp/webapi-controllers
# ✅ docker buildx build -t cs/controllers-web-api -f ./Dockerfile .